MyPaint v2.0.0 Released
MyPaint v2.0.0 is now released!
Head over to the release notes if you want more details about changes Here we’ll go into more depth about some of the changes, and things you should know as a user.
Linear compositing, spectral blending, compatibility
By default, MyPaint 2.0.0 uses linear compositing and spectral blending (pigment mode). This lends itself well to creating artwork emulating the use of traditional media.
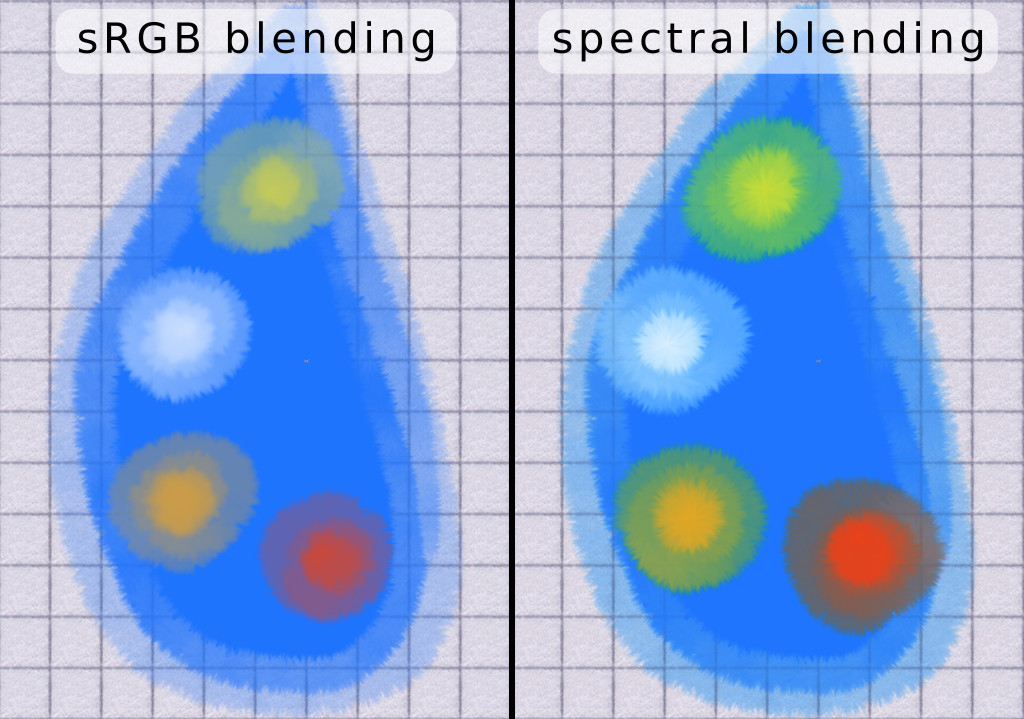
However, there are some drawbacks too:
- Worse performance - will be addressed in later versions.
- Compatibility with other .ora-compatible software, like Krita
- Layer merging generally not WYSIWYG.
Apart from that, some will of course just prefer the old methods. Fortunately this is still possible by changing the default compatibility mode to “1.x”. When you work in “1.x” compatibility mode, old files will look the same as they did in 1.2.1 and earlier, spectral blending is off by default and the default layer type is “Normal” instead of “Pigment”.
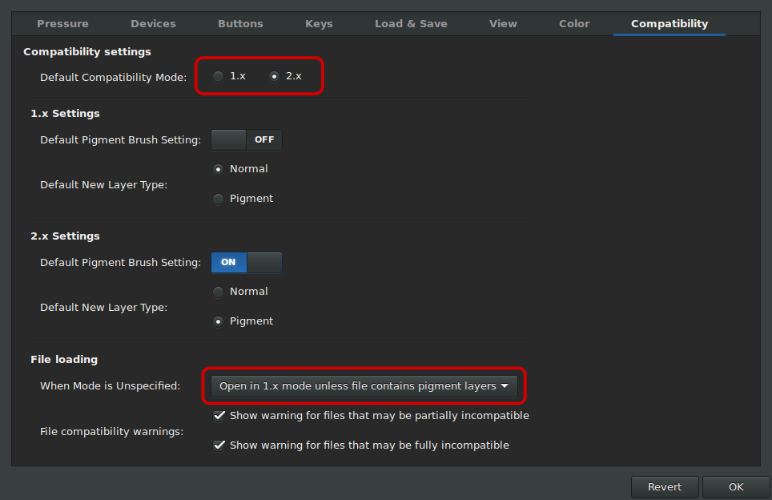
The drawback to “1.x” mode is that if you use pigment blending it will not work as well as in “2.x” mode. The assumption is that most people will use one mode or the other.
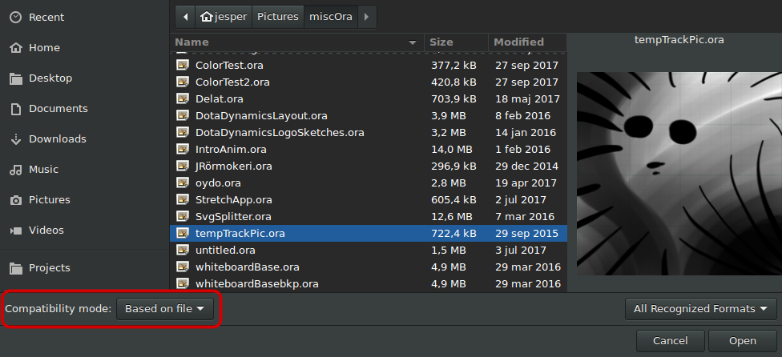
Note that by default, if you open a file with a layer of type “Pigment” in it, MyPaint will switch to “2.x” before loading the file, unless this behavior is changed in the options, or you use the dropdown in the file opening dialog to explicitly open the file in “1.x” mode regardless.
View Rotation and View Zoom now factor in to brush strokes
Old MyPaint users may notice that brushes don’t work quite the same way anymore. Specifically the rotation and zoom of the canvas now play a part certain aspects of the dabs that make up the strokes. Hopefully nobody’s too unhappy about this, because it is not configurable.
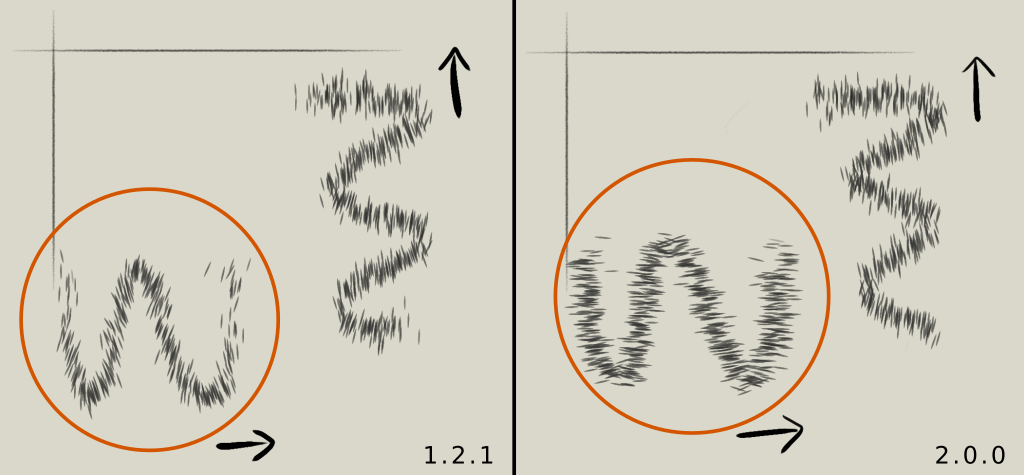
The arrows show what the drawer/painter saw as “up” when drawing on the rotated canvas. In 2.0.0 the behavior is more like actually rotating a paper in front of you, rather than rotating along with the entire canvas yourself.
As for zoom, the zoom level is now factored in to speed calculations and is also available as an input for brush settings.
New Brush Settings and Inputs
The maximum number of points in the input curves is increased to 64, providing a ridiculous amount of control to brush makers (much more than is necessary for the vast majority of input mappings).
New Settings
Smudge
- Smudge length multiplier
- Smudge transparency
- Smudge bucket
Directional Offsets
- Offsets Multiplier
- Angular Offsets Adjustments
- Offset X
- Offset Y
- Angular Offset: Direction
- Angular Offset Mirrored: Direction
- Angular Offset: Ascension
- Angular Offset Mirrored: Ascension
- Angular Offset: View
- Angular Offset Mirrored: View
Color
- Pigment
- Posterize
- Posterization levels
GridMap
- GridMap Scale
- GridMap Scale X
- GridMap Scale Y
New Inputs
- Direction 360
- Attack Angle
- Declination/Tilt X
- Declination/Tilt Y
- GridMap X
- GridMap Y
- Zoom Level
- Barrel Rotation
- Base Brush Radius
Symmetry Modes
Symmetry painting now has five modes to choose from (up from one, in 1.2.1):
- Vertical
- Horizontal
- Vertical and Horizontal
- Rotational
- Snowflake
Vertical and Horizontal refers to the orientation of reflection line, rather than the reflection itself - hence Vertical gives horizontal mirroring and vice versa. The observant user will note that Vertical and Horizontal` is a special case of Snowflake, but it’s a question of convenience and familiarity more than anything else.
Note that the symmetry mode does not provide “multibrush” symmetry. Instead of n separate brush strokes, it’s more like a single brush stroke copied n times (for every single dab). This is only noticeable when using a smudge brush on something that doesn’t follow the same symmetry as the active mode, but still good to be aware of.
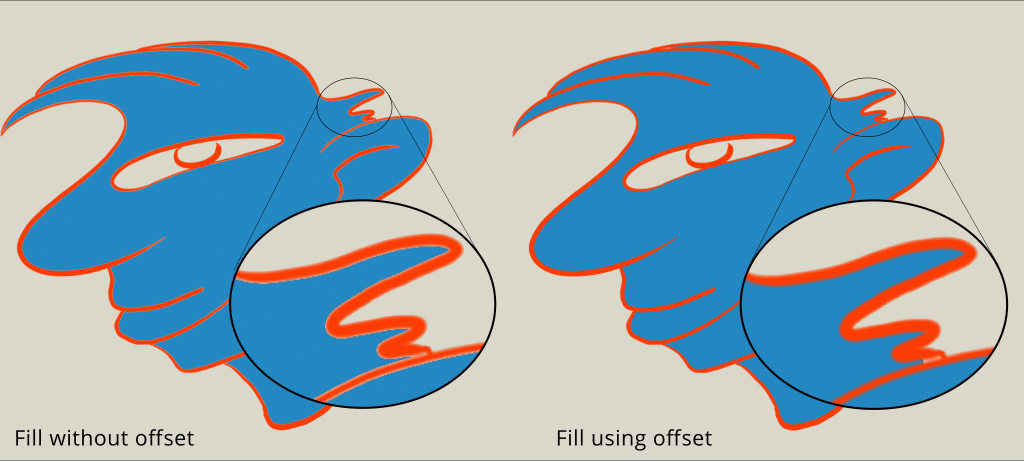
Floodfill enhancements
The floodfill tool now supports:
- Offset
- Feather (blur)
- Gap Detection
- Cancellation
and a few other things.
Most use cases only really require the offset setting, for handling cases where the fill does not flow into the outline sufficiently.
If you need to use Gap Detection, be careful to not set the maximum gap size too high. Ideally it should only be a couple of pixels larger than the largest gap in the area to be filled. Setting it to a distance that is too large is not only slower, but also makes it more prone to identify “gaps” which aren’t actually gaps.